My house was built in 1982. I moved in over a decade ago but never bothered to fix the non-functioning wired doorbell. I’m trying to diagnose it now to see if it’s worth trying to fix or if I should just let it go and maybe get a wireless one instead. I used a low voltage tester on the transformer in my basement and the tester lit up so it appears the transformer is working. However, when I tested both the outside lead wires by my front door and also the wires in the doorbell chime unit (NuTone KA-10), I’m not getting anything. What does this indicate and how involved is the fix? Do I need new wiring and if so, does that require following the wire all through my house and knocking out drywall? If so, I think I’ll pass on it. Thanks in advance.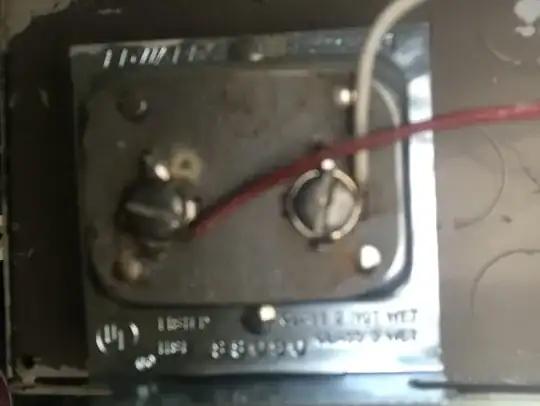

- 63
- 2
- 9
-
It could be "anything". What voltage do you measure on the transformer? Are you sure it is for the doorbell and not the thermostat or something else? – manassehkatz-Moving 2 Codidact Dec 13 '18 at 02:47
-
@manassehkatz the voltage is measuring 13.2V. I assumed it’s for the doorbell since it’s the only transformer I’ve seen (it’s located below the breaker box). There is a red and a white wire coming out of the transformer which combine into one – Dave Dec 13 '18 at 02:56
-
That does look like it could be a doorbell transformer and 13.2 V is closer to typical doorbell than to typical HVAC. The next step is to trace the wires and look for a break. – manassehkatz-Moving 2 Codidact Dec 13 '18 at 04:24
-
@manassehkatz how would I go about doing that? Do I need an electrician or is it something a newbie could attempt? So since I’m seeing voltage at the transformer and no voltage at the chime unit then there’s a break in the wire somewhere? Thanks for clarifying. – Dave Dec 13 '18 at 04:29
-
The good news is that since it is (a) low voltage and (b) easy to disconnect (screw terminals), it is safe to investigate yourself. What I would do (but I have tools for computer wiring) is disconnect the wires at the screw terminals and attach a tone generator and use a toner to find where the signal stops - assuming the wire is accessible in various locations between the transformer and the doorbell/switch. This type of tool: https://www.amazon.com/Extech-TG20-Wire-Tracer-Generator/dp/B00APD16D2/ref=sr_1_14?ie=UTF8&qid=1544676010&sr=8-14&keywords=toner+tester – manassehkatz-Moving 2 Codidact Dec 13 '18 at 04:41
-
1@manassehkatz wow, that's wild. so you would use that to try and trace the wire through the drywall. How would I even know what path the wire takes though? All I know is that I can see the combined wire go up somewhere above my circuit breaker panel on the backside of my house and somehow end up coming out of the wall near the front of my house where the chime unit was mounted. Thanks for the insight – Dave Dec 13 '18 at 16:26
3 Answers
The problem could be the button, the chime, the transformer (tested OK), or the wiring in the walls. Check the devices before chasing wires through walls. Start with the front button: disconnect and touch the 2 wires together. Does it ring? Then put your voltmeter on the chime coil. Does the chime get voltage when you touch the button wires together? If you have voltage at the chime with no bing-bong, then the chime is faulty. The only time you should measure voltage at the chime is when the front button is pushed. If it rings only when you touch the wires, then the front button is faulty.
- 1,985
- 6
- 7
-
I took the front button off a long time ago. When I touch the 2 wires together from near the front door, nothing happens. I tested the wires that go into the chime but I'm not getting any voltage there. I don't think I've tried touching the 2 wires from the front button together and then testing for voltage on the wires going into the chime...is that what you're saying I should test? Thank you. – Dave Dec 13 '18 at 16:29
-
Open the chime cover. Chimes usually have 2 coils: a bing-bong for the front door, and a bing for the back door. There will be 3 terminals inside the chime, A B C, with A the front coil, B the common, and C for the back door. Mark and remove the wires on the terminals to check the continuity (ohms) of each coil. The coil resistance should be between 100 and 400 ohms. If you have voltage (while pushing the button) and you have continuity, then the plunger could be stuck. The plunger should slide easily between the return springs. Clean it with alcohol or electrical contact spray, not oil or WD. – John Canon Dec 14 '18 at 02:25
-
I just posted a pic of the chime. I removed the wires to it. There was one red going to the trans. (Middle one) and the front (terminal on the right). There were also two white wires that were connected to each other with a wire nut. I just bought a multimeter...how do I test continuity of each coil? I’ve never tested the voltage of the wires going to the chime while holding the leads together that go to the button...is that what I need to do? – Dave Dec 14 '18 at 02:51
-
Set your multimeter (DMM digital multimeter) to ohms. Put the test leads onto TRANS and FRONT. Note the ohms resistance. Reading should be between 50 and 500. Then check ohms on the TRANS and REAR terminals. A super high reading means there is a break in the coil wire. In your picture, the solder joint at FRONT looks like it is breaking apart. Heat up a soldering iron and quickily remelt and add a touch of solder with flux. You can also unbend the 3 tabs and lift out the board with both coils.. Broken wires usually occur near the terminals rather than inside the coil. You are getting closer. – John Canon Dec 14 '18 at 06:06
-
You can also do the chime voltage test while the button wires are twisted together. Since you already have the wires off the chime, do the continuity tests first. – John Canon Dec 14 '18 at 06:09
-
I just reconnected the wiring to the chime (one wire on rear and one on the trans. screw) and set the multimeter to ohms. When I touched the probes to the screws on the chime, the multimeter reading was bouncing wildly all over the place. Does that have any significance? Sorry- I’m a newbie so I appreciate your patience. Not sure what you meant by unbending the 3 tabs. Thanks – Dave Dec 15 '18 at 17:57
-
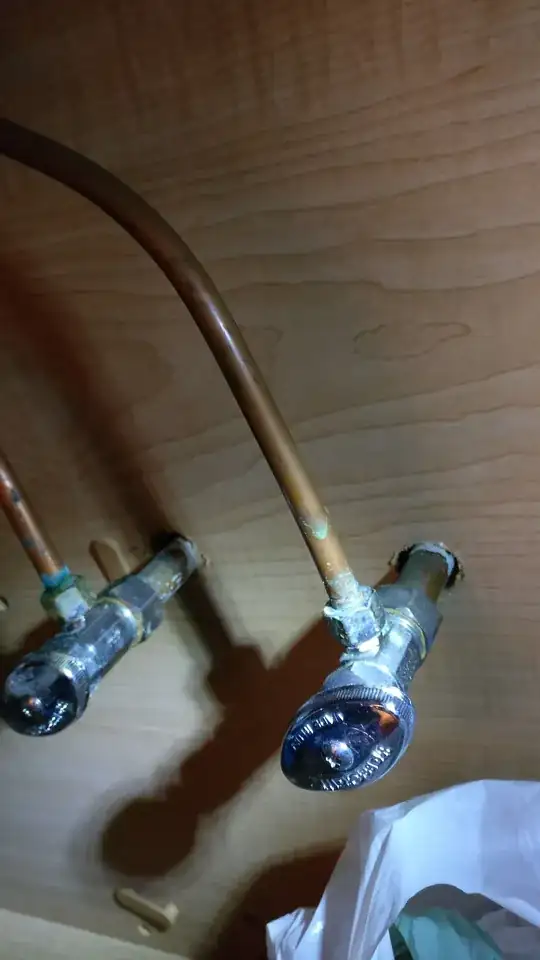
I should also mention I posted a new pic of my current setup. Do you think a new transformer is needed? It’s only reading 13.2v instead of the full 16. Or could it just be the wiring? – Dave Dec 15 '18 at 17:58
-
Only check OHMS when all other wires are disconnected. Test between TRANS and FRONT, then between TRANS and REAR terminals. If you get good ohms, put the wires back on and do the VOLTS check: connect voltmeter to TRANS and to the other FRONT/REAR. I notice you reconnected to REAR, instead of FRONT. Check volts with power on and button pushed (or wires twisted.) The tabs are visible (one is below NOT label.) Don't untwist the tabs yet. – John Canon Dec 15 '18 at 21:05
-
I could replace the transformer and chime but I’d rather not go replace everything if it’s just a short or break in a wire...couldn’t it just be as simple as that? It sounds tricky trying to track down where the break is. Ugh- I wish this was easier...I’m trying to avoid paying an electrician or going wireless. If I’m understanding you right, I disconnected the red wires from the chime and tested the ohms- the multimeter said OL – Dave Dec 16 '18 at 00:00
-
If your meter is auto-ranging, then OL means open circuit. If your meter has several OHMs settings, (e.g. 200,2000,20K, etc) switch it to a higher position. Did you check the front coil and the rear coil, both? If only one coil is good, use that one. If both coils are bad, the break is in the chime wire. The transformer voltage can be between 10 and 16 volts, and still work OK. Everything you learn from this repair will make you better equipped for the next one. Have a close look at the solder joints on the 3 terminals. – John Canon Dec 16 '18 at 00:37
-
All I’m getting with the multimeter is OL when I test on the higher position. Just to clarify- when you ask if I checked the front and rear coil, do you mean for voltage when connected to the terminals on the chime? Yes I tested both while the wires to the front button were touching and got 0v. Can you clarify which wire you’re referring to when you say the break is in the “chime wire”? Thanks – Dave Dec 16 '18 at 01:23
-
When OHMS is OL, then that coil is open circuit. Re-solder the 3 terminals. Then you can remove the board. Use pliers to slightly untwist the 3 metal tabs to a straight position, then lift the board. You will see the 2 coils. Look for any break or poor connection in the wires. Use OHMS to test the 2 coils. Always test the meter by touching the 2 test leads together. It should read less than 10 ohms. – John Canon Dec 16 '18 at 06:07
I don't trust anything other than a volt meter with low voltage because some are AC and some are dc. I have been fooled in the past with high end low voltage detectors. In my experiance the wiring is usually ok if it worked. The main problems I have found is bad switch or contact to the switch #1. The next check I have found is at the chime it self, many electronic chimes don't last long for my #2 problem. The more rare problem that I have found is the transformer has failed , for me this has happened 2x on on a Victorian home with a ceramic encased transformer and another with a 60's era transformer as #3. The last and number 4 issue was a residing company drove a staple through the twisted wire that shorted them together, the chime was connected all the time so it buzzed, the owner had replaced the transformer and switch prior to calling me. Found the shorted wire and pulled new wire then good to go. These are the problems I have found ( well other than a few tripped breakers for other reasons) so these would be the areas I would check. Some electronic chimes have back up batteries when the 9v battery died and actually dragged the chime voltage down it failed to work so there quite a few simple things to check. Added: since you have a simple chime unit this should not be hard. Your voltage is a bit low but I would expect it to work. My first test would be to disconnect the door bell switch and take a measurement, also short the 2 wires together by hand if the chime activates bad switch, you should see a voltage similar at the switch location, I suggest removing the switch from the circuit because lighted switches that have failed have provided strange readings. Verify the wiring a wire may have come off at the chime or transformer. I have found bad coils in chime units but this has been less often and I have not had both coils fail measuring the chime coil resistance should provide a resistance value on both coils if open the coil is bad. I had already had mentioned the wiring to the chime and and switch so this is all there is to test.
- 102,099
- 4
- 75
- 153
-
Thanks for the reply. The voltage meter reads 13.2V when I put a probe on each of the 2 screws holding the wires. The transformer has 2 wires coming out of it (red and white) which then combine into one. There are 2 white wires and 2 red wires coming into the chime itself (from hole in wall near front door). – Dave Dec 13 '18 at 03:05
-
So this is a 12v chime? Some are 24v just want to know the transformer value and chime rating, the 2 wires if other than the transformer could be front door / back door if either switch is bad it could cause problems, what kind of chime? – Ed Beal Dec 13 '18 at 03:17
-
I can’t tell because I can’t get my head under the transformer because of shelving located under the breaker box. I was able to take a picture of it and post it in my original post. I can’t make it out well but I can see it’s an Edwards transformer and the number at the bottom looks like 88080 or 88090 and it says class 3 wet, class 2 not wet. – Dave Dec 13 '18 at 03:48
-
I may have misunderstood your question- the chime is a NuTone KA-10. Not sure the volts...after doing some googling, maybe 16v? – Dave Dec 13 '18 at 04:21
-
It looks like 16 v is correct 30va looks to be the most common size. I would expect the unloaded (not trying to fire the bell) to have a slightly higher voltage at the transformer. – Ed Beal Dec 13 '18 at 15:02
-
So you're saying the 13.2v that is being read at the transformer is somewhat low? – Dave Dec 13 '18 at 16:30
-
I would expect a minimum of 16v if unloaded 18 v would not be high. With no voltage at the doorbell switch the coil on the chime may be open. If only 1 door switch is used swap from front door connection to the back door connection in the chime and give it a try, the rear door chime only hits 1 bar so it will only make 1 tone but may work and you will know the chime coil is open (needs to be replaced) – Ed Beal Dec 13 '18 at 19:10
-
so what is your hunch about what’s wrong? Do I need a new transformer? Is there still likely an issue with the wires too? – Dave Dec 14 '18 at 00:59
-
No voltage at the switch is a clue, you have a voltage at the transformer but it is low. Please try the rear doorbell connection it may work and show you the coil in the front doorbell coil has fried from a stuck button it happens but without more information and measurements there could be other problems. – Ed Beal Dec 14 '18 at 01:46
-
Sorry for my ignorance but what do you mean by try the back door connection. Nothing was ever wired up for the back door – Dave Dec 14 '18 at 02:43
-
Move the wire on the chime from front door to back door. I have explained the front coil may be bad. – Ed Beal Dec 14 '18 at 13:12
-
Not sure if I did it right- I set the multimeter to ohms and connected the one wire to the trans. screw on the chime and the other to the rear screw. When I touched the probes to the screws, the multimeter was flashing random numbers - for instance, 90.3 then after a few seconds 33 then 100 something then back down. Any significance to that? Anything else I can do? FYI- I took the front button off long ago so those 2 lead wires have been exposed to the elements for a long time. A problem w/ the wiring, the chime or new transformer is the big question. Is it easy to replace transformer? – Dave Dec 15 '18 at 17:44
-
Transformers are easy, turn the power off at the breaker panel there will be 3 wires that connect the transformer to the power a black white and green the black on the trans former to the black , white to white and green to bare copper. If the transformer has 2 blacks one of them goes to the white , the output side you already know the red white to the door bell chime center screw and 1 wire to the switch the other side of the switch to the front terminal not hard. If the rear chime won't work I would guess the transformer is probably bad not putting out enough to pull the chime slug to strike – Ed Beal Dec 15 '18 at 20:23
-
What do you suggest my next move be? Could it just be as simple as a short in a wire or a break somewhere in a wire? I guess I don’t understand how there can be 13.2v at the transformer but 0 at the chime and door if there’s no break or short – Dave Dec 15 '18 at 23:49
-
I have told you to try to change the chime unit from the front to the rear! If the switch got stuck in the past the front coil could have opened thus no voltage to the switch. This is a simple change you have 3 screws on the chime. The center common to the transformer, the front and the rear move the wire from the front screw to the rear screw. It may now have voltage at the switch and "ding" when the front door switch is pressed this is a simple circuit. – Ed Beal Dec 15 '18 at 23:54
-
I did try that but still 0v (moved the wire from the front coil to the rear) – Dave Dec 16 '18 at 00:09
-
If no voltage to the door switch it could be a broken wire but with the low voltage on the transformer that would be my replacement choice based on the info. – Ed Beal Dec 16 '18 at 14:18
You can purchase an electrical wire tracer and follow the wire through the house. This is also useful for figuring out if there are any breaks in the wire.
You can also test the voltage differences at the doorbell -- might be a bad doorbell, not a bad set of wires.
Easiest way to test this is to get a coil of wire and use it to test continuity each of your transformer->doorbell wires individually.
- 5,148
- 17
- 44
-
So with the wire tracer, I would try and trace the wire though the drywall? I have no idea the path it goes though..how are those used? I have tested the leads on the wires at the front door and don't get any voltage. Can you clarify what you mean by getting a coil of wire and doing a continuity test (sorry, i'm a newbie). I recently bought a multimeter so I'm assuming that I can use that to do the testing – Dave Dec 13 '18 at 16:32
-
https://diy.stackexchange.com/questions/74729/how-do-i-find-the-master-unit-for-an-intercom I used the electrical tracer by attaching it to the transformer wire and walking around the house looking like harry potter waving a wand. I eventually figure out a rough idea of where the wires went. To do a continuity test, you need a known good wire, so you can attach a long one to your transformer and drag it out to the doorbell. You can also use a multimeter as well-- look at the voltage difference between the wires. – gbronner Dec 15 '18 at 21:36
-
I seem to be getting 0v everywhere except the transformer (13.2v instead of the full 16). I was trying to avoid becoming Harry Potter to solve this but is it your hunch that there is a break or cut in the wire somewhere? I’m trying to avoid having to pay an electrician or going wireless – Dave Dec 16 '18 at 00:13